Storage management tools like Storage Sense, Disk Defragmenter, Disk Cleanup, etc., can help you clean junk files from your system. However, what about the files stored on your Recycle Bin? The files that you delete resides on your system. Until and unless you empty the recycle bin, you won’t get your storage space back. Recycle bin is pretty useful for easily recovering deleted files. However, sometimes we end up storing 20-30 GB of files in our recycle bin. So, if you don’t have a habit of clearing the recycle bin, you would like to limit the amount of space the recycle bin uses. Also read: How To Delete Temporary Files In Windows 10 & 11
Steps to Limit the Amount of Disk Space used by Recycle Bin
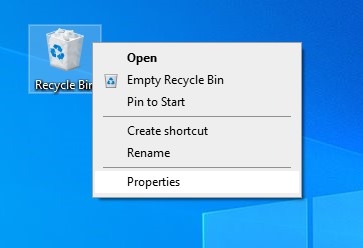
Hence, in this article, we will share a detailed guide on limiting the amount of disk space used by the Recycle Bin in Windows 10/11. Let’s check out. Step 1. First of all, right-click on the Recycle bin icon and select properties.
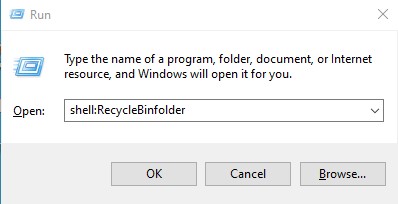
Step 2. If you don’t see the Recycle bin icon, open the Run dialog box (Windows Key + R) and type in shell:RecycleBinfolder. This will open the Recycle bin folder. Next, right-click anywhere, and select ‘Properites‘.
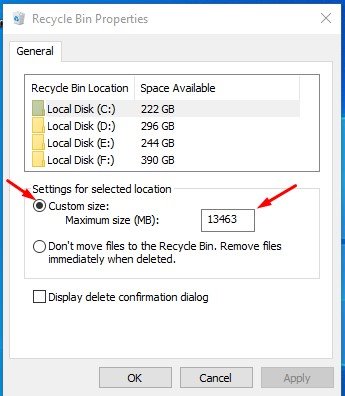
Step 3. On the Recycle bin Properties dialog, select ‘Custom Size’ as shown below.
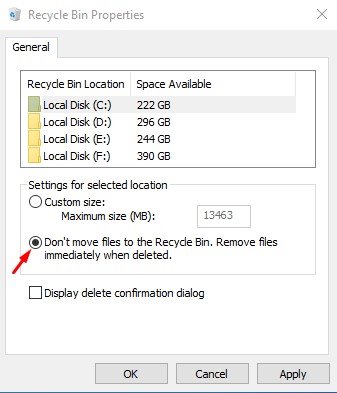
Step 4. On the Maximum size field, enter the size you want in MB. For example, 5000MB would assign 5GB of storage space. Step 5. The other option that you will find is ‘Don’t move files to Recycle bin’. Selecting this option will permanently delete files. If you prefer to have safety, don’t select this option.
That’s it! You are done. This is how you can limit the amount of disk space the Recycle bin uses in Windows 10/11. So, this guide is all about limiting the amount of disk space used by the Recycle bin in Windows 10/11. I hope this article helped you! Please share it with your friends also. If you have any doubts related to this, let us know in the comment box below.


